|
I am so happy with the collage art journal I made last time, that it is nearly full! I found the pocket pages particularly useful for collecting ephemera, like tickets – but I also found that I am still a big text and word girl. I mean I was rarely adding images – photos or torn clippings – to my journal. I did fold a few whole pages and insert them in the pockets, but these are the kind of things that I would then want to pin to a vision or inspiration board, rather than keep small in the notebook. And I must have a notebook with me at all times. That is just a given!
So I've been inspired to make a more note taking/scribbling/doodling friendly handmade art journal this time, and start from scratch so that I can use up what seems to be an ever increasing pile of good quality paper left over from document printing and the mail. I've realized that as much as I love the color and vividness of my collaged notebook, I need a higher proportion of light colored pages, just to make my copious notes easier to read later.
I don’t pretend to be an authority on making or binding books – but there are many blogs, websites and publications devoted to the art form. You will find a selection of these links, including a full bookbinding glossary, in the footnotes to this article on my Making, Mothering, Musing blog.
Here are the tools and materials I used to make my recycled journal – ready to carry in my purse as soon as the "big" (in my mind) colorful one is full. Please note I still wanted pockets – more if anything – so I have included optional pocket pages in my book. As an added bonus, this book turned out to be a much quicker project than the last one.
- Leftover printer paper or misprints.
- A few old bills and other light colored papers (I actually pulled these out of the "to be shredded" bag), including some scrapbooking remnants.
- Lightweight cardboard or wallpaper for covers
- Bone folder
- Paper trimmer (or scissors or blade & metal straightedge/ruler)
- Bodkin
- Big, honking doll making needle
- Heavy duty sewing thread
OR
OR
- Stapler
- Decorating supplies – stamps and inks, rub on transfers, phrases to collage, ribbon, borders or stickers from you scrapbooking stash.
Instructions
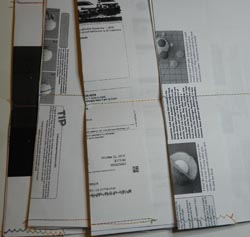
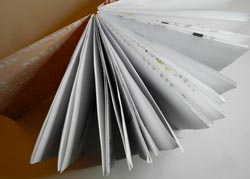
The folded sections in books – that is where the folds are against the spine – are called “signatures.” The simplest books are made from one signature, sewn or stapled to a folded cover, essentially without a spine. The number of pages in your signature may depend on your ability to punch or drill holes through them, and your ability to slice the fore edges even – often with a guillotine.
Decide on your finished size. Since I was using ordinary printer paper (8 1/2 x 11 inches) and I want mine to continue to fit easily in my small purse but I also want it to be easy, I made mine 6 inches tall and 5 1/2 inches wide (half 11 inches).
Slice 2 1/2 inches off the width of 16 sheets. (These make great memo tablets for shopping lists or by the phone.) Then instead of cutting, use a bone folder to score at the 2 1/2 inch line 8 more sheets. Fold at the score line to create pocket pages.
Layer one pocket page, two regular sheets, another pocket page and two more sheets to create a signature. Score or mark a vertical line in the center of the top sheet. This will be the fold line.
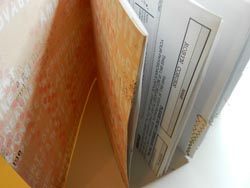
I used my sewing machine with variegated thread and a variety of stitches to sew the outside edges of the pockets, and down the center line of the 6 sheet signatures. Then I folded them, and pressed with a bone folder. Other choices would be stapling the signatures and pockets, or hand stitching.
At this point, art book binders will often drill holes all the way through the signatures and ladder or cross stitch them together. However, again for the sake or ease and speed, I simple glued the bottom page of one to the top page of the next signature, being careful to line them up at the fold. Also be sure that your pocket pages are the right way up!
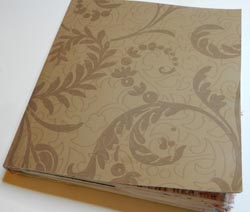
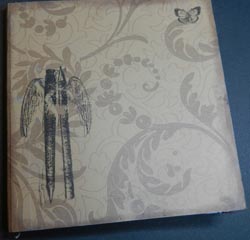
I had some 12 x 6 scraps of scrapbooking paper so I glued them to the front and back as facings, trimming off the excess. The spine is exactly half an inch deep. I could have used scrap cardboard or printed cardstock for the covers, but I still have quite a lot of wallpaper samples. So I cut a piece to size and glued it to my facings for a flexible soft cover.
Tip: make sure you use a glue that will dry flexible, not a simple white glue that will be hard and rigid. I like Best Glue Ever from ScraPerfect, but decoupage medium or bookbinders glue will also work well.
Variations: glue an eight inch length of narrow ribbon to the top inside of the cover at the spine, before gluing the cover to the facings, to be a book mark later. Sandwich two short lengths of ribbon between the cover and the facings at the "waist" to tie the book closed.
At this point the notebook could be considered finished and ready to use. Mine has a nice mix of already marked sheets – with the text going sideways, and plenty of space for notes and ideas.
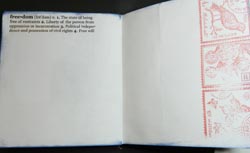
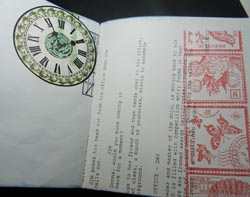
But where's the fun in that? Now would be the time to ink edges, perhaps in an assortment of colors, stamp images or borders on some of the pages, add favorite quotes from rub ons or in colorful caligraphy, or add stickers - just as I did with the spiral art journal. You could even age the book by painting tea or coffee over the pages, in sections.
Easy peasy hand drawn stamps
If you have some soft craft foam, a ball point pen, and possibly a mirror, you can make the easiest, quickest handmade stamps of all time. This is even easier than making stamps from expanded polystyrene packaging.
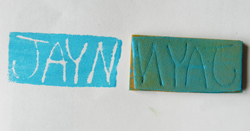
These stamps work to create a white line within the color, so the outside edge of the stamp is important. I recommend cutting a very neat rectangle or other shape to start, or cutting a narrow border around the design.
Draw into the foam with a ball point pen, pressing firmly. Designs that are simple and calligraphic, like woodcuts, work best. Words should be a mirror image, (see photo bottom right), so write them on paper first, hold them up to a mirror and copy what you see, or write on translucent paper and flip it over to see the correct image.
Paint a thin coat of acrylic paint on the whole stamp with a foam brush or small roller. You can mix the colors if you wish.
Flip the stamp on to your paper and roll a brayer over the stamp once. Peel the foam back, and there is your reverse image.
After a long career designing for theater and independent films, Robyn Coburn finds her joy as an unschooling mother who also writes and crafts. She has been a confirmed greenie since working for Greenpeace during her college years in Australia. Robyn is currently working on two crafty books, a fairy tale screenplay and a TV series about doll making and collecting. A past speaker and funshop presenter at Live and Learn Unschooling conferences, she contributes regularly to unschooling e-lists. She lives in Los Angeles, California with her husband James and ever inspiring daughter Jayn. Contact Robyn by email at dezignarob@gmail.com or visit her at www.robyncoburn.blogspot.com and www.Iggyjingles.etsy.com.
|


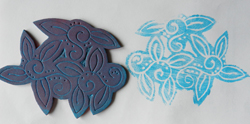 foam stamp for embellishing your notebook pages