|
Once upon a time scrapbooks were large format bound books with inexpensive buff colored, or more expensive black, paper pages, the purpose of which was to hold scraps – the ephemera, newspaper clippings, pressed flowers and other flat souvenirs of a person's life. It was rare for photos to be included - usually they were kept in photo books or photo albums.
Modern scrapbooking is something very different. In modern scrapbooking the point is the photo, ephemera is considered embellishment and may well be purchased or manufactured intentionally rather than collected, and the albums themselves do not contain pages, but plastic sleeves to hold the layouts on what might be a dizzying array of gorgeous papers.
And yet....
One of the latest trends in scrapbooking and paper crafting is "smash" books. These are relatively small scale journals or notebooks with many different page backgrounds designed to hold small ephemera and souvenirs and snapshots to commemorate events and daily life, along with diary style written journal entries. The idea is that these are intimate, fast, casual, personal, and most of all portable - a place where a pencil sketch of a view sits with the train ticket that took you there, and a postcard, and your jottings about the day and the weather and your companion – and later you slide a printed photo of yourselves into the pocket on the page.
They can also function as mobile vision boards. You tear an image from a magazine, and staple a swatch of fabric next to it for inspiration – then add a scribbled haiku, a newspaper clipping, and the folded schedule of classes at the community college. Another page might be nothing but a favorite quote surrounded by a wash of colored doodles.
Some might use a page a day as a diary of the wedding plans, the vacation, baby's first months, or any kind of personal odyssey or healing journey. Others use their book as a temporary place holder for memories and memorabilia before adding those elements to more formal scrapbook layouts.
What makes this kind of journal different from an ideas notebook or traditional diary is that it combines visual elements with the written notes – and gives permission to be messy, crazy, slapdash - mash the elements together with glue and staples and oh-so-pretty washi tape. The construction of the image is part of the image. One of the cool new tools available is the double ended glue/ink pen. It all about extemporaneous expression on the go.
I'm interested in making my own art journals. I carry notebooks everywhere to jot down ideas, plan out plots or presentations, or dash out a shopping list. I collect ephemera too, always thinking that this movie stub or that wrapper will make a useful addition to some scrapbook page or other. But half the time they end up lost in the detritus of less romantic grocery receipts and catalogs awaiting recycling, before I remember to use them.
Plus I notice once I start brainstorming, I completely ignore the lines on my notebook pages. There'll be arrows and sketches, stars and boxes – not neat and tidy at all. This is my visual thinking. So why not make the papers more interesting as well? I want to end up with keepers – a visual record of my process and progress in my artistic adventures.
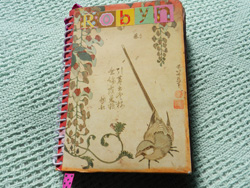
Converting a Spiral Bound Notebook
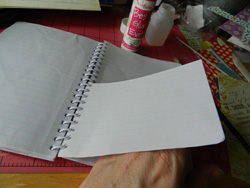
For this project, I'm starting with a small recycled paper notebook I found on sale.
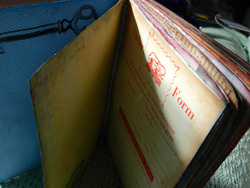
The book pages need to be relatively solid in order to carry the weight of ephemera without tearing, and it's useful to have regular pockets all the way through the book.
Start by adhering every two or three pages together with a glue stick or double sided tape. Mine were flimsy; I did three. This will minimize wrinkling. Every three or four of these new pages, leave a single sheet unstuck. This will become pockets shortly.
For the pocket pages, use the lines or the holes of the spiral binding to find the middle horizon of the page. Carefully tear the page away from the spiral binding from the top, stopping at the middle. Fold the page down making a crease horizontally across the page. Tuck the torn part back between the spiral binding over the existing holes. Glue the flap to its own page. Later I like to staple the pocket around the outside and bottom edges to either of the pages beside it, but you may prefer tape or glue. However it's easier to decorate the pages before attaching the pockets. For variety make a few vertical pockets by folding the page, well, vertically.
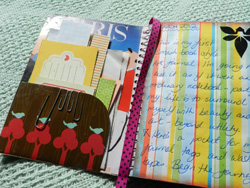
Now the decorating fun begins. Here are a bunch of suggestions for making the backgrounds of your pages. Oh, and leave a couple untouched – they will end up standing out!
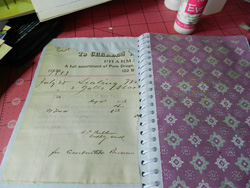
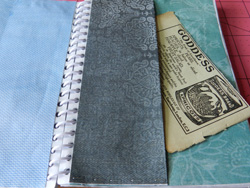
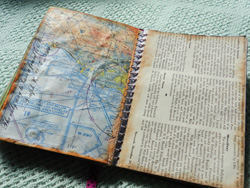
Decoupage the pages with other non-shiny paper such as:
- Old book pages
- Wrapping paper and tissue
- Brown lunch sacs
- Newsprint or magazines
- Remnants from scrapbooking
- Old bills
- The inside of security envelopes
- Greeting cards (not too thick)
- Mistakes from the printer
- Old calendar pages without identifying the month
- Old letters
- Junk mail
- Watercolor studies or tests
- Old sewing patterns
- Wall paper
- Takeout menus
- Graph paper - used is fine
- Ledger paper - so trendy!
- Street maps - also super trendy
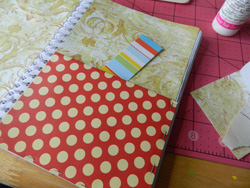
The idea here is to have a sense of texture. Make every page different from the one before.
And/or paint over the pages, either the original paper or the new covers, with acrylic paints or with pigment inks. Expect that there will be some wrinkling. You may also consider washing with white paint over some of these. Paint textures by using sponges, crumpled rags or spray bottles instead of brushing. Be cautious about getting too dark, unless you plan on journaling with light colored opaque pens.
Then embellish your backgrounds. Stamp textures all over pages, or stamp images that you like into corners. If you have any frame stamps, or can create them from foam, use these to create journal boxes.
Ink around the edges. Write out or glue printed quotes on random pages. One nice way is to write a quote as a border going all around a page.
Use paint or markers to create ready-made journal blocks on some pages. The front of the pockets are often great for this.
Oh, and remember to staple or glue your pocket pages to actually create the pocket.
Extras:
Glue an envelope that fits to the inside back cover – perhaps from a greeting card, or a seed packet. Keep a small stash of stickers, paper clips and tags to write onto, in this back pocket. You can slide the tag into the pocket of the page until you can attach it with staples or a brad (movement!) later on.
You should always carry a pen that will write on many surfaces with your journal, and consider a small glue stick or glue pen as well. Just make sure the lid fits well!
Cover your covers with any of the papers that you like, or with cloth glued well.
Starting From Scratch
There are some wonderful artists doing amazing things with their hand bound books. I'm not one of them, but I have gleaned some useful ideas from watching others at work on television shows and around the internet.
Super easy sorta cheating method:
Cut to your desired size, a mix of scrapbooking paper and cardstocks, paper shopping bags, wall paper pages and sketch book or water color papers. Note these are all quite thick and sturdy. Include some half pages for pockets. Cut two matching sized pieces of cardboard, like from a nice strong cereal box, as the covers. Take the whole mixed up batch to your local copier place and have them spiral bind the lot for you. Proceed with attaching pockets to pages and embellishing as before.
After a long career designing for theater and independent films, Robyn Coburn finds her joy as an unschooling mother who also writes and crafts. She has been a confirmed greenie since working for Greenpeace during her college years in Australia. Robyn is currently working on two crafty books, a fairy tale screenplay and a TV series about doll making and collecting. A past speaker and funshop presenter at Live and Learn Unschooling conferences, she contributes regularly to unschooling e-lists. She lives in Los Angeles, California with her husband James and ever inspiring daughter Jayn. Contact Robyn by email at dezignarob@gmail.com or visit her at www.robyncoburn.blogspot.com and www.Iggyjingles.etsy.com.
|