Crafting for a Greener World
Refashioning - Part 3 - T-Shirt Yarns
by Robyn Coburn
In Part 2 of this series, I wrote about refashioning t-shirts into clothing and bags. This time, we'll explore household accessories. Some of the loveliest recycled yarns are made from reclaimed sari fabric. With the bright colors of these traditional Indian garments and the soft hand and sheen of silk, sari yarn makes beautiful, gleaming knitted and crocheted items.
Ribbon yarn can be made from all kinds of old clothing and fabrics. There is a mom at one of the homeschool park days we attend who is in the process of crocheting a remnant throw. She has a multitude of vivid multicolored strips of cotton fabric left over from other home décor projects. The strips are close to an inch wide and she uses a whopping crochet hook. The blanket is looking gorgeous! Her pieces happen to be new, but there is no reason not to use old clothes for the same purpose.
One of the oldest traditional uses of this kind of yarn is for rugs: rag rugs, braided rugs, hooked rugs with scraps. Our frugal pioneer ancestors brought the traditions from Europe, especially England and Scandinavia. There are round braids and flat braids, different multiple strands, traditional and regional designs and color ways, methods that included using wagon wheels as looms – all based on the idea of long strips of reclaimed fabrics being reformed for practicality and beauty. During the early 1920s, the braided rug formed part of the Craftsman aesthetic, while during the Depression, reuse was rediscovered for more pragmatic reasons.
I’ve learned that it’s important to keep your strips the same width to avoid rug buckle, and to braid with even tension. There are even special conical tools that help you fold your strips in half neatly as you braid. For rugs, tucking all the raw edges under means a more durable finished product.
Some of the easiest ribbon yarn is made from our favorite old stand by, t-shirts. This yarn is good because the interlock cotton tends not to unravel on the edges. Tees can be dyed either before or after being cut up. For a variegated yarn effect, a tie dye shirt works beautifully. Tinting over several different colored joined yarns results in coordinates.
Two Ply Yarn
For a solid yarn, good for sturdy large stitch projects, you can treat tees in much the same way as the plastic shopping bags for plarn (see this column in Natural Life Magazine, July/August 2009).
Lay your shirt on a flat surface, side seams to the sides. Trim off the hem close to the stitching and set aside for another use (see next page). Then, starting at the bottom, cut three quarter to one inch wide strips straight across. You will have a circle of fabric. Continue cutting these strips until you reach the arm hole. Each circle is looped through the one before, fed through itself and pulled tight to form a two ply yarn.
I have used this in my round loom to create a nice cozy and masculine looking beanie hat. If I kept going, with more tees, I could make a good sized tote bag with a braided (use the hems!) or crocheted strap.
Single Ply Tee Yarn
 For a more pliable, finer yarn, trim off the hem of your shirt, then start cutting a continual shallow spiral. I have cut yarn as narrow as a half-inch as well as three-quarters to one-inch wide. Continue until you reach the under arm seams. For a more pliable, finer yarn, trim off the hem of your shirt, then start cutting a continual shallow spiral. I have cut yarn as narrow as a half-inch as well as three-quarters to one-inch wide. Continue until you reach the under arm seams.
There are a couple of ways to join these strips from shirts. One is to stitch the ends together. You’ll reduce bulk if you lay the two ends at ninety-degrees and stitch on the diagonal. Trim off the triangle a quarter-inch from the stitching line. This is generally neat and tidy, but assumes that you have a sewing machine.
Another is to tie the ends in a square knot – left over right, right over left. This is quick and simple, but not as tidy. For some projects, having little loose flags could be part of the charm.
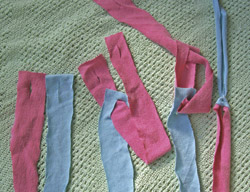
The third way, which makes a neat join, is the one illustrated on the previous page. Fold-and-snip small vertical (ie lengthwise) slits an inch from the ends. Feed one end of the first “ribbon” through the slit in the next, pulling just a few inches. Then feed the other “long” end of the first ribbon through its own slit and pull all the way through, eventually pulling it tight. This is a way to join all kinds of reclaimed fabric strips.
Projects with Fabric Strips
The Simplest Multi-Colored Scarf Ever
I’m not the first person to create this type of multi-strip scarf. I have found that the minimum length for a lush scarf is sixty inches. Lay out your strips on a flat surface. I rather like to use the bed for this. Mix colors, types of fabric, add some ribbons or regular yarns that you find harmonious. The scarf should be about six to eight inches wide. I find if it gets much wider than that, it starts becoming unwieldy, or needs many more joining pieces.
From extra strips, cut sixteen or so pieces as long as your scarf is wide. Sandwich your scarf between pairs of strips. Keep them roughly evenly spaced and use plenty of pins to hold them. Stitch across through all layers back and forth. You can straight stitch simply or use a fancy zig-zag or machine embroidery stitch in a contrasting color.
For a variation, you can insert some lightweight beads before pinning your joining pieces. Consider whether the beads are washable. A no-sew version involves laying out all your strips and then carefully tying knots in pairs of strips, then alternating with other strips, distributed unevenly along the length. The result is rather like a very loose net.
 Coiled Containers Coiled Containers
I’ve appropriated some rug techniques for prim or shabby chic style aesthetic because then I don’t have to be as persnickety about the raw edges or braiding perfection. (Oh quit smiling, it’s a real home décor style – just google and see.)
There are many fancy multi-strand flat and round braids, but for these projects I’ve used a simple three strand braid. I braid from a door handle or my exercise bike (at last a use for that thing). I add and braid, add and braid, until I have a good sized ball.
Then I coil, starting in the center of the bottom, with plenty of holding stitches through and around the braid. I use a needlepoint needle, which has an extra large eye, for sewing the strands with coordinating yarn. Kitchen twine or other cording would also work fine. Finish the top edge with a blanket stitch if you like.
Granny Squares
Wool yarn granny squares have been sneaking in to high fashion. They make a fun scarf. They also lend themselves to waistcoats/vests, or even lined skirts. Cate Blanchett wore a dress made from multi colored granny squares to a movie industry event, although that dress received mixed reviews from fashion watchers.
However, I should warn you that crochet, knitting, or round looming with tee yarn produces a very firm finished product. Even when the original tee is very soft, the stretching and folding that are part of the making process result in a thick and not very pliable finished item – which is why it makes good rugs and loomed totes.
The granny squares that I have made are solid and thick enough to use as trivets. I crocheted pairs of double crochet (aka treble crochet) rather than in threes, because of the thickness. Each square used about one-and-a-half of my daughter’s child-size medium t-shirts. I’m considering making a mat from these. I can see it being quite cushy as a picnic blanket.
Fat Tassels
Just for fun, I thought I’d manufacture some tassels, following the method that Mindy Haworth has demonstrated for belly dancing tassels. The preferred size is a CD or DVD (sideways) box.
Lay one ten-inch piece along the top edge of the winding box to be the loop of the tassel. Wind your strips (half-inch is best) over and over. Don’t be afraid to put a ton more than you think you need to really get a plump, round shape. Tie the loop strip, pulling firmly – before you cut the bottom loops.
If you can slide your box out before you snip the bottom loops open, that is even better. Grab your tassel at its “waist” and firmly wind another strip around a couple of times, tying tightly. Alternatively, use a thick rubber band around here, covered with a strip or ribbon. Cut the loops open and trim them to be as even as you like.
I put a couple of mule beads over the hanging loop before tying another knot. These even look good as gift package or holiday tree decorations.
Ideas for Leftover Hems
I was just playing around with one of the hemmed edges saved from an adult sized tee. Leaving a tail of about eight inches, I made a simple finger chain, stopping when I had about eight inches left on the other end. I pulled the last stitch through, locking the end. The result: a nicely sized tie-on head band or choker style necklace.
This started something. I threaded some beads and buttons on coordinating yarns, and crocheted a simple chain from both yarns together making chokers, cuffs, and pretty headbands. It is quite easy to crochet around each button with the loop over the hook “behind” the embellishment. My daughter Jayn’s small tees were shorter, but I hand sewed some elastic to those to make a nice secure head band.
Oh the pretties! Luckily, you don’t have to use only the hems for these, because it is really hard to stop. They could make a sweet project for a girl’s slumber party. Jayn thinks the white one with pearls would be lovely for a flower girl at a casual wedding.
Happy Crafting!
After a long career designing for theater and independent films, Robyn Coburn finds her joy as an unschooling mother who also writes and crafts. She has been a confirmed greenie since working for Greenpeace during her college years in Australia. Robyn is currently working on two crafty books, a fairy tale screenplay and a TV series about doll making and collecting. A past speaker and funshop presenter at Live and Learn Unschooling conferences, she contributes regularly to unschooling e-lists. She lives in Los Angeles, California with her husband James and ever inspiring daughter Jayn. Contact Robyn by email at dezignarob@gmail.com or visit her at www.robyncoburn.blogspot.com and www.Iggyjingles.etsy.com.
|