Crafting for a Greener World
Refashioning - Part 2
by Robyn Coburn
In my previous column, I talked about the idea of refashioning and remaking old clothes. Here are a few simple and fun craft projects for recycling t-shirt material into new clothing and accessories.
Tank Top Tote
At the two Swap-O-Rama-Ramas* where I designed recently, there was a woman showing people how to cut and sew their t-shirts into big tote bags. The edges on those were unfinished and pretty stretchy, because the sleeves and crew necks were cut off. I started thinking about how easy it could be to use old tank tops and “beaters” (what in Australia were always called “singlets”) to make totes in a variety of sizes.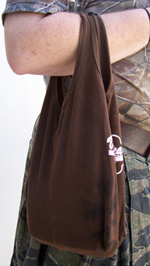
For a small tote – a book bag size – I used one of my daughter Jayn’s outgrown tank tops. There is a motif on the front of the shirt, but plain works fine too. Go ahead and turn your garment inside out to start.
When you look at the shape of a tank top, you immediately think of the plastic bags at the market. You’re thinking that you will stitch straight across the bottom. Don’t! There is a trick for a better shaped cloth bag. Here it is. Put the side seams together at the underarms. Smooth and flatten the tank top so that the center front and center back are now folded as the side edges of the tote. Your bag will have a seam running down the centers when you are carrying it, but that’s okay. Trim off any excess length as desired, leaving a half-inch seam allowance.
If you want to do any appliqué, or sewn embellishments, now is the time, while the bottom is still open. For example, some strips of pretty contrast ribbon over the seams would be a decorative accent. I like to use an iron-on fusing tape to baste fabric onto stretch knits. It helps to stabilize the underlying fabric and prevents puckering. However, still go ahead and sew over the fused material, making it permanently attached. As a variation, leave ten or so inches of ribbon extending loose at the top (the underarm) to use to tie your tote closed.
Now pin across the bottom, ensuring the former side seams meet at the hemline, or bottom of the tank if you have trimmed the length. Stitch straight across using a relatively small stitch length. If you plan on carrying heavy items like books, stitch across a couple more times for security.
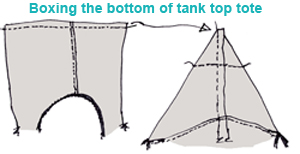 These soft tote bags work best with the bottom of the bag boxed. At the end points of the stitch line, fold the sides and bottom flat to make a triangle with the stitch line the “vertical” center line. (See drawing.) Sew the base of your triangle perpendicular to the stitch line, about two inches in, more if you have a long tank and want a wider box bottom to your bag. Trim off the small triangle, leaving a half-inch or so seam allowance. You can zig-zag your internal raw edges if you wish. These soft tote bags work best with the bottom of the bag boxed. At the end points of the stitch line, fold the sides and bottom flat to make a triangle with the stitch line the “vertical” center line. (See drawing.) Sew the base of your triangle perpendicular to the stitch line, about two inches in, more if you have a long tank and want a wider box bottom to your bag. Trim off the small triangle, leaving a half-inch or so seam allowance. You can zig-zag your internal raw edges if you wish.
Flip your tote bag right side out and start carrying stuff around.
At the last Swap, a teenager came up with a very pretty child’s cotton summer sundress. It only took a couple of minutes to turn that into a unique, already decorated tote bag. As long as there is room at the neck for the bag to open (that particular dress-bag could be unbuttoned at the neck if desired – so cute) and the armholes are wide enough for your hands, the possibilities are endless.
Another variation is to shape the bottom of your tote bag. Instead of making the box, you could cut the hem of the shirt in a curve, to a point, in a large zig-zag. Then skip the perpendicular stitching step. Just don’t forget to put the side seams together and change the silhouette first, or your bag will never lay flat across your body.
Extend the Life Of a Child’s T-Shirt
Making clothes smaller is easy. Making them larger, less so. We have gained a season’s more wear from some of Jayn’s tees by adding pieces to the side seams. Provided the fabrics are coordinating, the results can be pretty.
Turn your too small t-shirt inside out. Trim off the serged/overlocked side seams all the way through the armhole to the hem of the sleeve, cutting as close as you can to the edge.
From your coordinating fabric – an adult’s tee perhaps – cut two long strips a few inches wide, keeping two half-inch seam allowances in mind. I like to utilize the turned hem for the hem of the sleeve. Cut to length plus about an inch for a turn-up at the hem.
If you are adding only an inch or two to the width of your garment, which will also add to the underarm seam area, you can just go ahead and pin (use lots) the strip, or baste with fusible ribbon, and stitch the four seams. Start from the sleeve hems. Go slowly and gently; to avoid puckering don’t pull on either of these stretchy fabrics. You are adding stretch to the width or girth of the garment, not the length, so you don’t need to use a zig-zag or stretch stitch.
 However, if you are adding more to the width, the sleeve could become gappy and flappy. There are a couple of solutions, depending on your child’s preferences. One is to live with it. One is to run elastic into the sleeve hem and create a little puff sleeve. Another is to shape a taper into the added strip from the underarm seam to the sleeve hem. Make sure you taper in evenly from both sides. This can be done at the pinning stage, when you just cut off the excess fabric (the offcuts’ shape will be some tall skinny triangles). However, if you are adding more to the width, the sleeve could become gappy and flappy. There are a couple of solutions, depending on your child’s preferences. One is to live with it. One is to run elastic into the sleeve hem and create a little puff sleeve. Another is to shape a taper into the added strip from the underarm seam to the sleeve hem. Make sure you taper in evenly from both sides. This can be done at the pinning stage, when you just cut off the excess fabric (the offcuts’ shape will be some tall skinny triangles).
In one of my prototype efforts, I made a mistake with this so I tried to fix it by taking some darts in the under sleeve area. Jayn found the darts uncomfortable and refused to wear the shirt. Oh well.
Finish the hem by turning up the allowance and stitching straight across – or just trim it level. Interlock knit tends not to unravel.
A variation on this idea is to turn a favorite tee into a maternity tee by adding a good sized triangle shaped piece into the side seams. Just to be clear, the point of the triangle is at the underarm or sleeve hem. If desired, some strips of ribbon, made from the insert fabric or matching the base fabric, can be inserted into the seam at about the waist to act as ties, allowing the mother to customize the fit of her shirt to her changing shape.
Depending on the style, the initial shirt may need some extra length added. I would add the extra pieces for length first, then cut my side inserts to fit.
Once you start looking at your old clothes as resources for creative remaking, it’s near impossible to stop. When the time comes for us to discard Jayn’s outgrown clothes, we divide them into three piles: garments as hand-me-downs for our smaller friends, garments that we want the fabric for crafting, and a few items left over for donation.
Jayn has made several stuffed toys at swaps and at home, aligning a feature in the fabric with her paper pattern cut-out shape in order to make it special. Recently she has joined several of her friends in snipping old socks apart to make clothes for their sock monkeys.
Learn More
* A Swap-O-Rama-Rama is an event where you take your old clothes, choose other clothes to take away, and in the meantime there are designers, stitchers, screen printers, appliqué makers, stencillers, usually some felters, and at least one group making monsters and stuffies, all with their equipment and their expertise ready to help you transform the old stuff into something cool and new. Volunteer to help and admission is free. More info and local events can be found at www.swaporamarama.org.
99 Ways to Cut, Sew, Trim and Tie Your T-Shirt into Something Special by Faith Blakeney, Justina Blakeney, Anka Livakovic and Ellen Schultz (Potter Craft, 2006)
After a long career designing for theater and independent films, Robyn Coburn finds her joy as an unschooling mother who also writes and crafts. She has been a confirmed greenie since working for Greenpeace during her college years in Australia. Robyn is currently working on two crafty books, a fairy tale screenplay and a TV series about doll making and collecting. A past speaker and funshop presenter at Live and Learn Unschooling conferences, she contributes regularly to unschooling e-lists. She lives in Los Angeles, California with her husband James and ever inspiring daughter Jayn. Contact her at dezignarob@gmail.com or visit www.Iggyjingles.etsy.com.
|