Crafting for a Greener World
A Story in Dioramas
by Robyn Coburn
 When I was young, one of my favorite outings was to the Natural History Museum in Sydney, Australia. Housed downtown in one of the oldest and grandest sandstone buildings of Australia’s Victorian colonial era, it seemed like an endless maze of huge rooms. The best part was the miniature dioramas. Part of the fun was searching for these small windows in each new room. You put your face up to the little square peephole and behind the glass would be a magical miniature scene – diminutive dinosaurs roamed swampy landscapes punctuated by lurid, distant volcanoes; tiny wooly mammoths stomped through glacial scenes; and cave men squatted around faux fire pits. When I was young, one of my favorite outings was to the Natural History Museum in Sydney, Australia. Housed downtown in one of the oldest and grandest sandstone buildings of Australia’s Victorian colonial era, it seemed like an endless maze of huge rooms. The best part was the miniature dioramas. Part of the fun was searching for these small windows in each new room. You put your face up to the little square peephole and behind the glass would be a magical miniature scene – diminutive dinosaurs roamed swampy landscapes punctuated by lurid, distant volcanoes; tiny wooly mammoths stomped through glacial scenes; and cave men squatted around faux fire pits.
At first, it was a question of finding all of them. In subsequent visits, keeping count. Oh, the excitement when a new diorama was added to the exhibits! The science may have been made obsolete by new discoveries, but the dioramas remained as charmingly nostalgic illustrations of the progress of thinking about natural history, with new labels pointing out any factual flaws.
Nowadays, we love to visit the Natural History Museum here in Los Angeles, where the California exhibit features dioramas of early life in the region. Scenes of Native American daily life, a cross-sectioned model galleon, and miniatures of some of the first missions are featured in glass cases. Disneyland’s California Adventure also has some miniature diorama windows that we never fail to revisit – in the foyer of the tortilla factory.
Today, these have just as much charm for me and for my daughter Jayn as those beady eyed, tail dragging dinos did when I first glimpsed them over thirty-five years ago. We have been making our own dioramas – tiny three dimensional pictures – on and off for a couple of years, using recycled packaging and other materials. I have made ones from boxes the size of a lipstick box, with a single cut out figure. Jayn has made tiny 3-D pictures using polymer clay pictures and bits of spare jewelry. 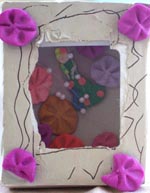
But recently, we have been inspired to make our own miniature art dioramas, in a slightly larger version, using the perfectly good leftover cardboard food containers that I have been collecting for arts and crafts purposes. Without a doubt, this has become our newest favorite crafty pastime. Jayn and I just can’t seem to stop. Luckily, with the plethora of raw materials available to us every time we come home from the market, we don’t have to.
The variations are endless. The illustration can tell a story, take you on a whimsical journey, or just be inspired by a favorite song or fairytale.
Here’s the How-To:
Start by carefully opening and flattening your box. Don’t cut off any of the tabs – they make it easier to put the box together later. Clean off any crumbs. Fear not – we have found that the slightly waxy coating inside many of these boxes is easy to clean but still accepts glue and acrylic paint perfectly well.
Using a ruler, measure and mark a frame in one of the large sides. I leave about half-an-inch as my window frame, which seems a pleasing proportion and still allows plenty of room to view the scene. Cut out the window and set that cardboard piece aside to use for other cut-out shapes later.
Now start making your background. I have found that it is important to extend your background design to the walls on the side, and to be aware of the floor or ground and the roof as you create.
What to use as a background? Jayn calls it cheating, but I like altering color pictures from the travel section of the newspaper sometimes. For example, I found a wonderful perspective drawing of a European village, complete with a bicycle leaning on the wall, which cried out to become a diorama. I added cut-out people and a tree, and Jayn painted a face peeking out from a window. It’s like a little hope chest, depicting my dream of travelling around Europe one day with family.
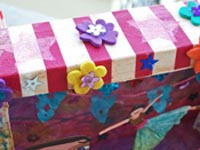
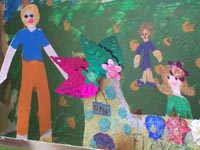 Jayn usually prefers to paint her background freehand. In her diorama of “The Flower Seller” (left), she created a flowered hillside meadow. Another alternative, as shown in my “Circus Dancer” diorama (right), is to use collage to make something abstract. I layered cut pieces of my tie dyed paper towel paper to create a swatch of color and then went joyfully nuts with glitter paints and sequins from my stash. I made the banner garland from folded tissue paper and colored embroidery thread. Jayn usually prefers to paint her background freehand. In her diorama of “The Flower Seller” (left), she created a flowered hillside meadow. Another alternative, as shown in my “Circus Dancer” diorama (right), is to use collage to make something abstract. I layered cut pieces of my tie dyed paper towel paper to create a swatch of color and then went joyfully nuts with glitter paints and sequins from my stash. I made the banner garland from folded tissue paper and colored embroidery thread.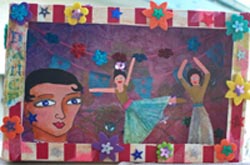
Once the background is done, it is time for the three dimensional elements. Items can be glued to the back as appropriate or be free-standing. I have been cutting very simple figures from card, and Jayn particularly enjoys the detail work of painting their clothes and faces for me. However, you can use small toys or family photos glued to card, or make little figures from polymer clay. Clothespeg people could be an alternative, or wooden Japanese Kokeshi figures. I have even made abstract people from glass beads glued together. Their clothes can be painted or collaged.
If you have a collection of any kind of miniature figures, a diorama box is a great way to display them or repurpose them.
Plan where your people or things will go, then put the box back together. I like to fold the box so that the front tabs (around the window) go over the back ones. In this way, the seam is facing the back of the box. I glue, but I also use masking tape over the outside seams. This creates a better finish later.
Then it’s time to insert the figures or other visual elements. I started by cutting out a cardboard folded tab base to glue my figures and plant elements to the ground. Jayn prefers to make a triangle shaped support glued vertically to the back, and to be honest I think she’s got the better idea. It’s less fiddly to cut out. For my circus dancers, which are en pointe, I coiled a stand from craft wire and glued it on, and this has been the best method of all, since it remains flexible. Either way, we use hot glue for speed. With younger folk, white glue might be preferred, although you may have to prop the figures until the glue has dried.
The outside of your diorama is also a canvas for your story and creativity. I like to start with a white wash front, sides and back – usually two or three coats of white craft or poster paint to cover up the brand art on the box. Then, for some dioramas, a simple translucent wash might be sufficient….nah, where’s the fun in that?
Embellish! Stamp! Decoupage! Glue on bits and pieces! Make the outside equally a part of your miniature narrative as the inside. It’s possible to attach little feet to your diorama. It’s also possible to plan to stack them by not putting 3-D elements on the top or bottom. You can use letters, buttons, cloth, ribbon, twigs, foam shapes, bottle caps – anything that fits. I tend to like the look of an aged finish – but it’s not essential.
Where can you find ideas for your own dioramas? They can be like cool 3-D scrapbook pages if you use family photos. It can be a shadow box of memorabilia. A haunted house, an abstract assemblage, a festive wish book. A favorite story or fairy tale illustrated like Macy’s Christmas window in miniature. A historical interior, a recreation of a famous painting or scene, a vision of the future, the four seasons. Jayn never seems to lack for an idea, usually writing a story for the picture. The depicted story could be printed out and decoupaged to the back side of the diorama.
This column was originally accompanied by a contest, which is now over. You can view some of the entries here.
After a long career designing for theater and independent films, Robyn Coburn finds her joy as an unschooling mother who also writes and crafts. She has been a confirmed greenie since working for Greenpeace during her college years in Australia. Robyn is currently working on two crafty books, a fairy tale screenplay and a TV series about doll making and collecting. A past speaker and funshop presenter at Live and Learn Unschooling conferences, she contributes regularly to unschooling e-lists. She lives in Los Angeles, California with her husband James and ever inspiring daughter Jayn. Contact her at dezignarob@gmail.com or visit www.Iggyjingles.etsy.com.
|