|
 With the holidays approaching (how did that happen so fast?), I thought it was about time I made the Tree Topper Angel from recycled materials that has been mulling around in my consciousness. With the holidays approaching (how did that happen so fast?), I thought it was about time I made the Tree Topper Angel from recycled materials that has been mulling around in my consciousness.
This is a great project because there are so many possible variations. It will work as a tree topper for a reason that will be obvious in a moment, but also as a decorative accessory for the mantle or table scape. Nor need it only be an angel. With a very few alterations the design can be adapted to be a group of Victorian carolers, pretty fairies or even a Kitchen Witch for Halloween decor.
Gather your recycled materials and tools:
- A 7-8 oz drinkable yogurt or smoothie bottle, with lid
- A 32 oz soda cup from a fast food place – preferably plastic, but expanded polystyrene will do. (I'll mention a variation in a minute – a regular sized yogurt container, or 16 oz drink cup)
- About 18 inches of aluminum foil
- Old magazines or junk mail
- White Glue and/or Mod Podge
- Hot glue (optional)
- Masking tape or cloth tape
- A good sized sheet of tissue paper in a single color or pattern
- Acrylic Paints in assorted colors
- Paper doilies (as wings)
Embellishments:
- Corrugated cardboard
- Yarn for hair
- Scraps of lace, fabric, string, yarn, trims, wire
- Buttons, beads
Thoroughly wash and dry the plastic bottle and cup. It is remarkable how similar the diameter of the bottom of the bottle is to the bottom of the cup. Attach the small bottle to the upturned cup with hot glue or other glue and tape. This will only be temporary, as the paper maché will hold the two pieces together very firmly shortly.
Crumple the aluminum foil into a ball about 1.5-2 inches across. Roll it on the table top to smooth and define it. Attach it to the screw on lid of the small bottle. I used a toothpick to help, but hot glue is fine and again the upcoming layers of paper maché will hold it. Screw your head in place.
Using 2-3 inch squares of paper and diluted white glue (or undiluted Mod Podge/gel medium), cover the entire piece with paper maché, overlapping well. I started at the waistline, just to make the construction firmer so that I could turn it around in my hands. Allow this to dry thoroughly, preferably overnight.
Make the arms. I had some scrap soft foam that I rolled and taped to be two arm shapes, but rolled and taped paper would work just as well. Glue them in place in the traditional pose of angels or carolers. If needed, tape them down, and then continue with the next layer of paper maché.
 Once that is dry, add a final layer of strips of tissue, allowing the thin paper to crumple a little and add texture. I used a printed tissue that became part of the aged texture, but you can use any one that fits with your final idea. Once that is dry, add a final layer of strips of tissue, allowing the thin paper to crumple a little and add texture. I used a printed tissue that became part of the aged texture, but you can use any one that fits with your final idea.
Variation: In the event that you are in a hurry, you can use a product called Rigid Wrap instead of the paper maché. You would attach your arms first, and then add a single layer of Rigid Wrap, cut into short lengths, starting from the top. Rigid Wrap is essentially cheesecloth impregnated with plaster, like plaster bandage. The proper way to use it is to dip it in water and immediately pull it out and drape it. Do NOT allow it to soak, or the plaster will wash away. The final result will be somewhat heavier – better for a table top than a tree top. It will dry in several hours and can be painted.
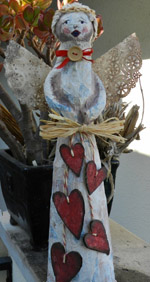
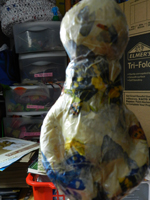
Once the form is dry, it’s time to start painting and decorating. I like the prim style, because it hides a multitude of flaws and works so well with the bumpiness of paper maché. To that end, I whitewashed the entire angel, and then added aging with brown paint. My wings are laser cut paper doilies, aged lightly with inks, folded and glued in the back. I could have made wings cut from corrugated cardboard, or a bow tied of stiffened tea stained muslin.
I had some kitchen string that fits the prim aesthetic, which I glued and braided onto the doll's head. I drew the singing face very simply with marker, and used watercolors to add some personality. I could have used small buttons for a nice effect too (next time).
I cut rough hewn prim style hearts from corrugated cardboard, whitewashed them, and then aged with colored paint and inks. I had some charming country style yarn, and some raffia to make attaching them to the skirt very simple and quick, plus I saved one for the back. I added some lace and ribbon remnants as the collar, and finished with a plain wood button.
However, there is no reason that you couldn't add all kinds of different colors and decorative elements – rhinestones, bunches of holly, gold trim or rick rack, a fur hemline – to your figures. They need not be prim style at all. They could also be painted in bright colors of the season to suit your holiday decor. A grouping of several different heights, perhaps one for each member of the family (with the men wearing a top hat?), would be lovely. Maybe each one could hide a trinket under the skirt.
After a long career designing for theater and independent films, Robyn Coburn finds her joy as an unschooling mother who also writes and crafts. She has been a confirmed greenie since working for Greenpeace during her college years in Australia. Robyn is currently working on two crafty books, a fairy tale screenplay and a TV series about doll making and collecting. A past speaker and funshop presenter at Live and Learn Unschooling conferences, she contributes regularly to unschooling e-lists. She lives in Los Angeles, California with her husband James and ever inspiring daughter Jayn. Contact Robyn by email at dezignarob@gmail.com or visit her at www.robyncoburn.blogspot.com and www.Iggyjingles.etsy.com.
|
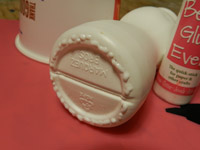
Glue the cup to the bottle
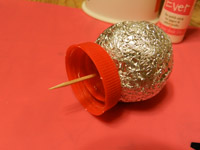
Make the head
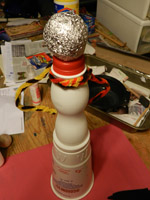
Assemble the parts
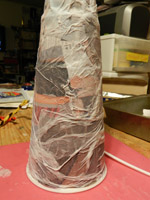
Cover with paper mache
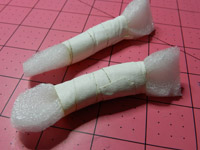
Make the arms
Apply the final layer
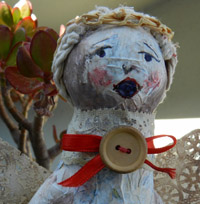
Face detail
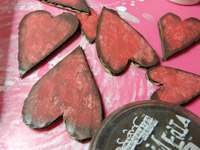
Painted cardboard hearts for trim
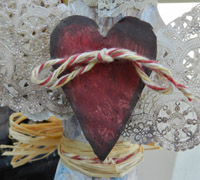
Back detail
|