|

How to Save Seeds from your Garden
by Judy Gaunt
Plants that reproduce through natural means tend to adapt to local conditions over time, and evolve as reliable performers in that locale. The modern trend to rely on hybridized and cloned plants negates these evolutionary processes and thousands of varieties of vegetables and flowers are being lost, due to the reliance on commercial hybrid seed. This erodes the gene pool, resulting in less hardy, more vulnerable plants. If you’d like to join the growing movement of organic gardeners and farmers who save their own seeds, here’s what you need to know.
Since I've been saving seeds for over ten years now, I'd like to pass on some of the knowledge I've gathered about the subject to help you along the way.
First of all, it's necessary to know how to keep varieties pure and this varies with each type of plant. Then, you need to know how to prepare, clean and store the resulting seeds.
Solanaceae
The nightshade family contains tomatoes, eggplants, peppers and potatoes as well as garden huckleberries, tomatillos and various ground cherries.
The tomato is grown by more home gardeners than any other vegetable. Since many tomatoes commonly grown are hybrids it must be remembered that while hybrid seed will grow, you can't be sure what the result will be. The new tomatoes may resemble their grandparents or great grandparents rather than the plants you started with. This is true of all hybrid seed.
But if you're starting with an open-pollinated (non hybrid) variety you can save tomato seed by cutting the fruits in half, scraping the seeds and the juices around them into a container and letting it ferment for three days at room temperature. This removes the gel coating from around the seeds and also prevents the transmission of some seed-borne diseases.
After fermenting, rinse the seeds under running water in a strainer and then put them on a small plate to dry. The seeds should be stirred occasionally the first few days to keep them from sticking together. Let them dry thoroughly before storing.
Regarding cross-pollination, the newer varieties are much less apt to cross as the pistil is covered in the flower and not exposed to passing bees. Older, heirloom varieties are more likely to be crossed because of the flower structure. Separate these varieties from other tomatoes as much as possible.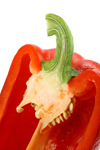
Peppers
Peppers are self pollinating but can be crossed by insects so different varieties must be either caged or separated by 500 feet to maintain purity.
Let the fruit mature before removing seeds. Remember that when working with hot peppers, rubber gloves should be worn. Also don't rub your eyes at this time as the hot pepper oil can be extremely irritating.
Eggplant
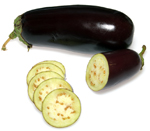 Eggplant usually self pollinates but insects can sometimes be a problem so to be sure, different varieties should be separated by 50 feet, or caged. Eggplant usually self pollinates but insects can sometimes be a problem so to be sure, different varieties should be separated by 50 feet, or caged.
To obtain seeds, first let the fruit ripen, then grate or blend the bottom part of the fruit which contains most of the seeds. Put the pulp in a bowl, fill with water and squeeze the gratings with your fingers, separating the seeds from the pulp. The pulp will rise and good seeds will sink to the bottom.
Potato
While usually propagated vegetatively, the potato can be grown from seeds which occasionally form on the plants. Let the seed balls mature, then squeeze the seeds into a bowl. Add water and pour off the floating debris, saving the seeds which sink to the bottom. Grow the same as tomato seedlings.
Some of the smaller nightshades, such as cherry and currant tomatoes, tomatillos, ground cherries etc., can be processed in a blender and treated the same as potato seeds.
Legumes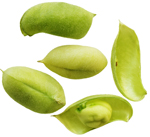
The usual families of beans and peas are common bean, pea, lima bean, fava bean, soybean and runner bean.
While the families do not cross, different varieties within the same family will cross. The amount of crossing varies in different locations. Here in Eastern Ontario where I live, I have had some crossing between bean varieties but in an area with fewer wild bees perhaps there would be less. So I would recommend separating varieties as much as possible. To be absolutely sure, plants can be grown in cages or blossoms bagged with spun polyester until the pods begin to form.
The way I deal with legumes is to wait until the pods are quite dry and the plant is drying up and leaves falling off. Then I cut the whole plant and place in the carport or shed to dry further. Later, I either pick off the pods and shell them by hand or else put the whole plants in a feed sack or on a large sheet of plastic and beat them with a stick until the seeds fall out. They have to be quite dry for this though and sometimes in a damp fall they never get to the right stage and have to be shelled by hand.
Pods can also be picked while still in the garden, as long as they are beginning to dry up and becoming flexible rather than stiff. Make sure all seeds are placed in an airy, dry place once shelled to continue to dry. Mould is the enemy of seed savers.
Lettuce
Lettuce seeds are quite easy to produce although they are difficult to clean. Just let the plants go to seed. They grow two or three feet tall and are covered with small yellow flowers. Eventually, small seed pods form which are ready when dried up and brown. The pods can be individually picked by hand and opened up, which is time consuming but the best way to get clean seed. The heads can also be shaken over a paper bag, which is easier but results in a lot of chaff with the seeds. The seeds are so light that they're difficult to separate but if just for your own use the whole mixture can be planted and the seeds will still grow.
One bonus from producing your own lettuce seed is that early next spring you'll get lots of volunteer lettuce plants which you can transplant where you wish. You'll have early lettuce without much trouble.
Lettuce is self-pollinating generally but occasionally can cross with wild lettuce, a common weed. Any growing nearby should be removed.
Cucurbits
The squash and melon family is a large and varied group of plants. As with legumes, crossing can only take place between different varieties in the same family, not between members of different families.
 Cucumbers Cucumbers
Different varieties of cucumbers will cross with each other. However, Armenian cucumbers, West Indian gherkins and serpent gourds belong to other families and will not cross. Separate varieties by one half mile or else just grow one variety. Otherwise hand pollination is necessary. Space does not allow a description of this, perhaps in another article.
To save cucumber seeds, the fruits must be allowed to mature far past the stage they're usually eaten – until they're ripe and have turned orange or yellow. Remove the seeds and let them ferment in a pail for three days the same as tomato seeds to remove the gel around them. Then they can be cleaned by repeatedly filling the pail with water and pouring off the top layer. The good seeds will remain on the bottom while the debris will float and can be poured off. Dry the seeds thoroughly before storing.
The rest of the cucurbits are easier to do as the seeds don't have the gel coating and don't need fermenting.
Melons
All melons will cross with each other so must be either grown in isolation or hand pollinated. The seeds are easily removed and dried. Remember that hybrid melons may not come true.
Watermelons
These will only cross with other watermelons or citrons. Once again, the seeds are easily processed.
Squash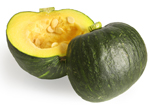
These are rather complicated in that there are four different families of squash commonly grown here. As usual, the families don't cross but members of the same family will and it's necessary to know which family a particular variety is in. One member of each family can be grown together without crossing, which is the method I use. Otherwise, hand pollination is necessary.
Examples of the most common members of each family are:
Cucurbita maxima: Atlantic Giant, Banana, Buttercup, Golden Delicious, Hubbards, Turbans.
Cucurbita mixta: Crooknecks, Cushaws, Tennessee Sweet Potato squash.
Cucurbita moschata: Butterbush, Butternut.
Cucurbita pepo: Acorn, Crookneck, Delicata, Pumpkins, Scallops, Spaghetti squash, Zucchini.
Let the fruits mature fully before harvesting for seeds, even those usually eaten when immature such as zucchini. The seeds are easily removed although you may need an axe to chop the squash open. Germination is better if fruits are allowed to age for at least three weeks after harvesting before removing seeds. As usual, let seeds dry thoroughly before storing.
Corn
Corn is difficult for the seed saver as in many areas, acres of field corn are grown that can be crossed with your open-pollinated corn by the wind.
Most corn grown these days is hybrid so the seeds will not come pure if grown. An open-pollinated variety must be either hand pollinated or grown in isolation to maintain its purity.
Biennials
Now that you know all about saving the seeds of many annual vegetables, it's time to learn about another group, the biennials. These plants have seeds which are more complicated to produce although it's not necessarily more difficult.
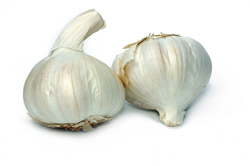
The biennials consist of all the root vegetables, from onions to turnips as well as some members of the cabbage family.
Onions, carrots, beets, parsnips, salsify, turnips and rutabagas are all treated in much the same way. They're harvested in the fall, stored over the winter and replanted in the spring. The second year they flower and produce seeds.
For winter storage, I'm lucky to have an unheated basement, which keeps the root crops cool enough. I store them in large plastic pails with lids. You could also use a root cellar, either indoor or out, or maybe even store them where they grew in the ground if you covered them with enough bags of leaves or other insulating material. Those growers in the milder areas can leave these plants outside to winter over.
The only plant you would not want to store this way is onions, which require a drier storage area. We keep onions in an unheated room in the house.
 In early spring the roots are planted out. Again, remember to keep everything labeled, both while being stored and once planted. It's amazing how easy it is to forget vital information after a few months, even if you told yourself you'd remember. In early spring the roots are planted out. Again, remember to keep everything labeled, both while being stored and once planted. It's amazing how easy it is to forget vital information after a few months, even if you told yourself you'd remember.
Some people worry about carrots crossing with the wild carrots so prevalent in many areas, but I have found that my carrots bloom earlier than the wild carrots and it doesn't seem to be a problem. As with the other vegetables, if you plant more than one variety you may have some crossing.
The plants will grow quite tall – taller than they were the first year – and eventually seeds will form. I usually cut the seed heads and hang them up to dry or keep in a paper bag until they're dry enough to remove the seeds.
The other biennials are in the cabbage family. This is a rather complicated family as there are a few annuals in it and there are many members which will cross pollinate with each other.
Chinese cabbage, mustards and some radishes are the annual family members and saving seeds from them is easy. Just let them flower and go to seed and then collect the seed when dry.
One group – Brassica oleracea – contains broccoli, Brussels sprouts, cabbage, cauliflower, kale and kohlrabi. These will all cross so it's best to only try to save seeds from one member or else separate them by a half mile.
Another group – Brassica rapa – consists of turnip, Chinese cabbage, and Chinese mustard so only grow seed from one of these.
Rutabaga (Brassica napus) – the large winter turnips – don't cross with the small summer turnip (B. rapa) but will cross with Siberian kale and rape.
Since these plants are insect pollinated and not self-fertile, caging them is difficult. Another thing to remember is that it's necessary to grow several plants for seed to maintain vigor in the variety. Six plants is the bare minimum but more would be better.
The whole plant including the roots has to be dug up and brought in for the winter, if in a cold winter area. If planted several to a pail, (turnips don't have to be planted) they usually survive the winter although they look quite pale and yellowish by spring. Then plant them outside and hope they have the vigor to survive and begin growing. If they do, they'll produce lots of yellow flowers, which the bees love, and then lots of seeds.
Brassicas produce an abundance of long seed pods which can be harvested after drying out. Dry them further under shelter and then beat them in a plastic bag or feed sack or on a sheet of plastic until the seeds fly out. Again, make sure the seeds are thoroughly dry before storing.
Cleaning and Storing Tips
Now I'd like to tell you of some ways I've found suitable for cleaning and storing the many kinds of seeds it's possible to save.
Freeing them from their seed pods or whatever other covering nature provided them is the first step.
Small quantities of seed can be simply rubbed between the hands. Some tougher types of seed pods can be rubbed against a piece of screening with the sole of a running shoe to separate the seeds from their stems or pods. Grains are one kind I do this way. I've already mentioned beating dry, brittle seed pods with a stick over a sheet of plastic. And I find it rather relaxing to shell some seeds such as beans or peas by hand while watching TV in the evening.
Then you have to clean all the chaff from them. I have a series of six screens, each a different size which are helpful in sifting some kinds of seeds.
An ancient method I use a lot is to pour the seeds back and forth between two large bowls outside on a breezy day, which will blow away most of the chaff. Just be sure that you don't also let many of the seeds blow away!
Another method is to pour the seeds onto a sheet spread in front of a fan. The heavier, best quality seeds will fall onto one area of the sheet.
Remember to keep the seeds dry and exposed to the air at all times until they're ready to store. Mould will quickly kill them. The top of the refrigerator is a warm, dry place in most homes. I use baskets – of which I have a large collection – for many of them. Baskets enable air to circulate all around the seeds. Small plates or bowls are useful for the small seeds that are not suitable for baskets.
When the seeds are thoroughly dry they can be stored. Larger seeds are ready when they will break rather than bend. I sometimes use the bite test for beans and peas. When they are too hard to be bitten they're ready.
For storage, airtight containers are best. Glass jars are ideal and can be used in all sizes, from baby food jars to gallon bottles.
During storage, it's important to keep the seeds as dry and cool as possible. A collection of seeds in paper envelopes could be placed in a gallon bottle. The freezer is good for long time storage if the seeds are in an air-tight container.
I hope I have given you the encouragement and help you need in order to begin saving seeds. Maybe I should warn you that once you begin working with nature in this way, it may become a compulsion as it did with me and you'll find yourself with the same large hoards of seeds. Good luck with it anyway!
|