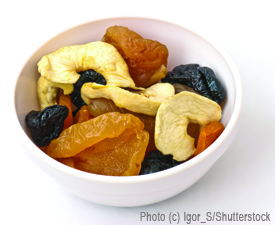
Dehydrating Foods
by Michelle Branco
 While freezing, canning, and fermenting the harvest can all serve to stretch the use of our gardens, dehydration has some special advantages. So here are some tips for how to dehydrate foods. While freezing, canning, and fermenting the harvest can all serve to stretch the use of our gardens, dehydration has some special advantages. So here are some tips for how to dehydrate foods.
Like fermentation, drying is an ancient method of preserving foods. In its simplest form, it requires no electricity or even cooking fuel and not only preserves food for a long period but also renders it more space efficient and portable by reducing its volume and weight.
Dehydration itself can be achieved with a number of different methods, some of which are extremely simple and others which require significantly more energy and equipment.
The end product of dehydration is best described as leathery – pliable and dry to the touch, but not crunchy. Ideally, you’ve concentrated the essence of your fruit or vegetable for safe keeping, not eradicated it!
Commercially dried fruits often are treated with sulfites to improve storage and protect color. Unfortunately, this is a common allergen and trigger for asthma – some home cooks turn to their own dehydrating just to avoid this.
To maintain color, you can pre-treat fruits that are prone to oxidization with a solution of one teaspoon of lemon juice to a cup of cool water. For tart fruits, which will be eaten out of hand, a honey dip can add sweetness and also reduce browning – use a quarter cup of honey to one cup of water.
Sun Drying
This is a method that requires virtually no fuel and very little equipment, but requires the co-operation of Mother Nature. In fact, sun drying is a bit of misnomer as many foods are actually dried somewhat in the shade in order to reduce excessive heating and maintain quality and color. Ideally, there should be low humidity with temperatures in the mid- to high-30C (86F) range. In addition, bear in mind that food will be exposed to air for an extended period – so very dusty (or contaminated) areas are not suitable.
There are some common exceptions to the fairly restrictive limits. Herbs can be easily dried in the shade at most summer temperatures, as can beans and mushrooms, as long as the humidity is fairly low.
As with all preserving, begin with the best quality produce you can find at the peak of ripeness. Under-ripe fruits in particular should be avoided – the lack of sugars can make for an unpleasantly tart end product once all the moisture is gone. Vegetables can also be tricky to dry successfully in the sun due to lower acidity and sugar levels – a well-known exception being tomatoes.
| While freezing, canning, and fermenting the harvest can all serve to stretch the use of our gardens, dehydration has some special advantages. |
Particularly with sun drying, even thin slices will ensure a consistent end product with the right amount of moisture throughout. The type of screening you choose is up to you – for small batches, a few cookie cooling racks may do. Larger batches may be more efficient on a framed screen. Plastic and metal screening is generally fine, but take care to avoid galvanized metals as these contain potentially toxic coatings that can transfer to foods.
Lay slices on the mesh frame, making sure they are not touching. Cover the frame with a cheesecloth-covered second frame to keep insects and dust away. Let sit for four to ten days, covering at night to keep the dew off. Watch the drying carefully by turning over the pieces every few days and discarding any produce that appears to be spoiling.
Oven Drying
If your sun drying experiment gets stuck in a wet spell or you just don’t have the climate necessary, a similar environment can be created in most home ovens. The disadvantage is that the lowest heat level you can achieve in an oven is often higher than ideal, so you’ll need to keep the fruit or vegetables thin so that they evaporate moisture quickly, rather than steaming. Slices should be about five millimeters (a quarter inch) thick and as evenly sized as possible.
On a cooling rack, space slices evenly, taking care not to overlap. Set oven to the lowest possible setting, with a convection fan if possible. If you are there to supervise, you may also leave the door slightly ajar, but don’t leave the house or go to sleep with an open oven door. Turn the fruit or vegetables over every four to six hours.
A significant advantage of oven drying is that it is much quicker – most thinly prepared fruits and vegetables are leathery and pliable within twelve to eighteen hours. Once they are ready, open the door and let them settle for another twelve to twenty-four hours to distribute the remaining moisture more evenly before storage.
Oven drying can also be used for turning meat into jerky, although the safety and preparation considerations are a bit more involved. (See the Learn More section at the end of this article for a link to more information about making jerky.)
| Consider buying a food dehydrator as a community item with a couple of friends to share the cost as well as the storage space. |
Dehydrators
A dehydrator is, of course, tailor-made for drying foods and thus is both efficient and reliable. One disadvantage, beyond the initial cost of buying one, is that the space you gain in your cupboard by dehydrating may well be taken up by the storage of the unit itself! Consider buying one as a community item with a couple of friends to share the cost as well as the storage space.
More sophisticated models will have different temperature settings for different types of foods. You should follow the specific instructions provided with your unit. One big advantage of the dehydrator is that food pieces can be left much larger and do not need to be quite as consistent in size, meaning less work for you!
Fruit Leathers
While we strive to preserve foods at the height of freshness, one neat way to use dehydrators is to make fruit leathers. Fruit leathers are a great portable snack and can be made from virtually any puréed fruit – including fruits that might not be as suitable for other preservation or eating out of hand. Some clever mothers have even used the baby food purées left over in their freezers to make popular snacks.
Particularly good choices for fruit leathers include peaches, apples, and plums, as well as mangoes. Experiment with different types of fruit; you can mix them together or use a squeeze bottle to create a “variegated” fruit leather.
Spread the purée thinly and evenly over the aluminum foil (or the fruit leather insert that comes with most dehydrators) and set it to “dry.” In the oven, it should take about eighteen hours, while the dehydrator may take as little as twelve. It is ready when there are no soft spots left and the surface is just tacky. Let it rest at room temperature overnight, cut into strips, and store.
Storage
Store dehydrated foods in airtight containers only; otherwise, they will absorb ambient moisture, which may cause spoilage. I prefer to store them in small batches because if there happens to be one piece that spoils the whole container of food may be ruined. Every time you open and close a container, you potentially introduce moisture and bacteria that may reduce the shelf life. So it is worth keeping the containers small. Glass jars work well, as do freezer bags.
Raw food websites are often a good source of ideas for food dehydrating. Happy drying!
Michelle Branco is a freelance writer and blogger at www.mamabear.ca. There, she writes about mothering, breastfeeding, product safety and food. Her much-put-upon family serves as lab assistants, taste testers, and clean-up crew. She is also an International Board Certified Lactation Consultant and when she’s not at the keyboard or experimenting in the kitchen, she runs a private lactation consultant practice at Latch Lactation www.latchlactation.com.
|