Crafting for a Greener World:
Mixed Media Wall Art From Recycled Materials
by Robyn Coburn
Here are some wall-hung projects using materials from your recycling bin or pile of unused objects ready to be given away. Their sole purpose is to inspire happy feelings.
Making art with recycled materials – with their the ragged edges, aged and distressed worn surfaces, rusty and scraped finishes – tends to result in either prim/ folksy/grunge styles or industrial/gothic/ steam-punk. But that doesn’t mean that you can’t repurpose wooden kid’s blocks to make very slick Nordic style minimalist relief wall art, or collage tiny pieces of junk mail paper to resemble an ethnic inspired portrait, or create an embroidered or woven modern abstract piece using deconstructed sweater yarns.
We all have different aesthetic sensibilities – visual styles to which we are drawn. In these projects, I’m making things I find attractive, in order to illustrate some techniques that you can use in other projects. I hope you will enjoy these art works for many years to come so they should reflect your taste. If you like ragged edges, as I often do, then use them. If a torn edge annoys you, certainly use a blade or scissors for a sharp one instead. Finally, family photos can always be incorporated into the pieces.
Lollipop Flower Shadow Box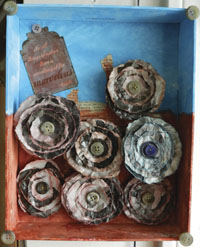
Materials:
Clean, lidless pizza box, cardboard box lid, tray, or shadow box frame
Magazines or papers/cardstocks, favorite quotes (optional)
Acrylic paints
Ink/stamp pads (or more paints)
Buttons – assorted sizes and styles
Craft wire (around 24 gauge)
Toilet paper or paper towel rolls
Spare cardboard
White glue or decoupage medium
Tacky glue or low temp. hot glue
Hanging method
Optional: gemstones, glitter glue for embellishments
Tools:
Pencil
Paint brushes
Makeup sponge (optional for inks)
Small/jewelry wire cutters
Small/jewelry pliers
Scissors
Optional: Circle cutter, craft knife
Design Tip:
Create unity and balance by limiting the color you use to two complementary hues or two analogous and one complement. Complementary colors are pretty much opposite each other on the color wheel, while analogous colors are close to each other. They can be bright or muted, depending on the desired finished look.
A warm color scheme might include mustard yellows and red with a hint of turquoise. A more romantic style might use raggedy paper flowers possibly mixed with fabric remnants in muted roses and burgundy with a hint of olive and beige. A crisp, modernist look could be achieved with red, white, and black sharp edges. Choose color and style to suit the room where the finished art will live.
Step One: Paint background colors.
If you are using a cardboard box, you should paint both inside and out to minimize warping. Paint your two complementary colors above and below a horizon line. If desired, decoupage strips of pages from magazines, old books, or junk mail, and wash over them with diluted paint once the glue dries. Attach your quote, if using, to the top left area, the part where the eye usually starts. Set aside for now.
Step Two: Prepare a bunch (an odd number) of “Lollipop” or medallion stacked flowers, in one of two ways. Choose several pages from a nice quality magazine or catalogue with thicker paper, in your chosen colors. Or black and white photos can be very cool looking.
Raggedy Torn Flowers: Hand draw five or six circles in graduating sizes from about one inch in diameter to about four inches. Cut them apart, outside of the drawn line. Working slowly, tear around the drawn line in very small increments, pulling the outside of the circle up. The idea is that the rough edge that might reveal the inside of the paper is left on the circle.
Cut flowers: The easiest way to cut the flowers is to use a circle cutter, but in the absence of that tool, scissors work fine, if more slowly. Draw circles in graduating sizes using a compass or a selection of round lids or cups. Cut them out, then continue.
When you have all your circles ready, color the edges with an ink pad or by pouncing on acrylic paint with a sponge (makeup sponges work well and can be washed and reused many times). Alternatively, paint a circle close to the edges on each layer.
Once dry, add another dimension by crumpling then unfolding each circle.
Pierce the center of the circles with a hole punch, bodkin, or needle. Stack them, smallest on top, ready to be joined with a button brad. For a romantic touch, cut medallions from paper doilies as the top layer. Age them with light brown ink/paint if they are bright white.
Variation: Graduated ovals also make interesting graphic flowers, especially if the hole is off center and the layers are in different colors. For a slick retro look, try only three layers in plain cardstocks, and don’t crumple.
Step Three: Button Brads (my favorite!)
Cut a piece of craft wire about four inches long and fold in half. Stack one, two, or three pierced buttons and feed the wire through the two holes, or across a diagonal if the buttons have four holes. Twist the wire “legs” together just twice. Feed the brad through the center hole in the paper circles, then feed another small button (I save clear shirt buttons for this) on each leg and push firmly to the top. Twist only twice to secure. Why? Because any more twisting and the wire tends to break.
Step Four: Assemble
Attach the flowers at various depths by using sections of toilet paper rolls or paper towel rolls. Cut the tubes into one-quarter, to one-half, to one inch lengths, depending on the depth of your shadow box.
Glue the backs of the flowers to their stands, folding the wire inside. After the glue has dried and set, arrange the flowers in a pleasing vignette. If you have a focal point flower, such as one of a contrasting color, try and place it to the lower right third, where the eye naturally comes to rest – at least for English language readers.
Once you are satisfied, glue the flowers to the background.
When dry, attach a hanging device to the box. I glued a ribbon to the back, because mine are light. Alternatively, you can stand your box on a mantle or shelf, even adding feet of something like thread spools or stacked buttons.
More images are on my Making, Mending, Mothering blog www.robyncoburn.blogspot.com. Happy Crafting, and please send photos!
After a long career designing for theater and independent films, Robyn Coburn finds her joy as an unschooling mother who also writes and crafts. She has been a confirmed greenie since working for Greenpeace during her college years in Australia. Robyn is currently working on two crafty books, a fairy tale screenplay and a TV series about doll making and collecting. A past speaker and funshop presenter at Live and Learn Unschooling conferences, she contributes regularly to unschooling e-lists. She lives in Los Angeles, California with her husband James and ever inspiring daughter Jayn. Contact Robyn by email at dezignarob@gmail.com or visit her at www.robyncoburn.blogspot.com and www.Iggyjingles.etsy.com.
|