Crafting for a Greener World:
Crafting With Used Polystyrene Foam
by Robyn Coburn
It is easy to see why Styrofoam™ has become so very widespread since its patent was granted in 1954. Lightweight yet rigid and strong, capable of being injection molded cheaply and with heat insulating properties, it certainly does a fine job of keeping food cool and clean, preventing fragile goods – particularly electronics – from being damaged in transit, and helping countless school kids complete their models of the interior of cells or the solar system. If only it weren’t part of the grand problem of waste plastic.
Who hasn’t cursed the thoughtless vendor who sent their parcel packed with those pesky polystyrene foam packaging “peanuts” that inevitably spill and stick annoyingly to fingers? Personally, I recycle the few that I still receive to the local mailing store, but if I do send them as part of a package, I like to put them in a bag first to create a little pillow. If you must use them, I urge you to buy the cornstarch “peanuts” that dissolve completely in contact with water.
Here are some ways to re-use the styrofoam that comes into your life.
 Stamps Stamps
Stamping is such fun. I love finding new ways to create images on paper or fabric. For example, the cut end of a head of romaine lettuce produces a wonderful squiggly image, rather like a stylized carnation. The problem with stamps made from carved food, like the old reliable potato, is that they are temporary.
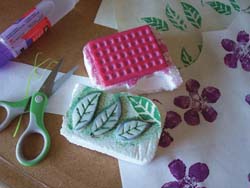
As much as I try to avoid getting polystyrene foam food containers, some do come into my house. So I give them a good scrubbing, and reuse them for stamp forms. Sometimes they have a texture imprinted already, which make nice stamps for background textures. Because it’s soft, the foam is easily cut with scissors or a craft knife. Even strong pressure with a ball point pen can help with the cut and add texture, as I did for the veins on the leaf stamps pictured here. I often use glue dots or double-sided tape to mount the stamps to extra pieces of foam or to wood blocks.
My experience is that many ink stamp pads designed for rubber stamping make rather pale, almost shadowy images with cut polystyrene foam stamps. That is great if you are looking for a very subtle texture. However, I prefer to use a brush to load my stamps with regular acrylic paint.
Some firmness is needed in pressing an even image. The result will be a textured, somewhat rough finish – perfect for a folk art, shabby chic, or primitive style aesthetic. For the photo here, I stamped a bunch of simple flowers and leaves on sketchbook paper, stamped textured background pieces, and made some Easter cards to send to friends and family. The base of these cards is some scrapbooking paper I already had, but I could easily have made hand-painted paper to use for the cards.
These kinds of simple stamps would be great for gift tags with coordinating gift wrap also. My next plan is to make a hand-cut alphabet. (Don’t forget to turn the letters over to use as stamps so that you don’t create a mirror image!
Fantasy Sculptures
Polystyrene foam can be cut, and it can also be compressed by finger pressure. It is soft enough that simple items can be inserted, like toothpicks or bamboo skewers to join shapes. It can be glued with ordinary white glue or tacky glue. It can be painted with tempera or acrylic paints – in fact, it is important not to use spray paints or oil/solvent-based paints, which will usually dissolve it.
| Concerned about the health and environmental issues around working with polystyrene foam? Check out Robyn Coburn's blog post for more info. |
Many people recommend using a heated wire tool to cut polystyrene, but that will cause fumes. I’m here to tell you that a serrated edged knife will usually do the job admirably. When I made Bottom’s donkey head for a production of A Midsummer Night’s Dream some years ago, an ordinary bread knife carved the shape perfectly well, although it would have been faster if I had had an electric carving knife.
Pieces of foam can be formed into miniature house or building shapes, or joined together with toothpicks into something more abstract. The foam can also be treated as an armature on which to build paper maché or plaster bandage sculptures (like Bottom’s head). Alternatively, the pieces can be painted or decorated with fabric scraps, like a quilt or mosaic. Beads, buttons, or cut shapes threaded onto ordinary sewing pins secured with a dab of white glue embellish your sculptures.
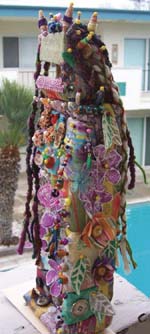
Project: Tribal Totem Figure decorated with fabric, paper, beads and found objects
1. Gather your materials and tools – I have custom-made papers of tie-dyed paper towels, magazine pages, wrapping paper, other paper ephemera; fabric remnants, ribbons and yarns, buttons and charms (mostly from repurposed jewelry), non-toxic white glue, craft wire, sewing pins, beads (including paper ones), acrylic paints. Tools: scissors, tweezers to help place things, brushes for glue and paint, bread and butter knife from the kitchen drawer (that is, not too sharp).
2. Cut or tear your papers and fabric remnants into smallish pieces. I started with about four-inch squares.
3. Choose one or more pieces of chunky polystyrene foam. I generally use pieces from various electronic packaging. I have been known to fish clean polystyrene foam packaging from the dumpster if the pieces are interesting shapes. Pieces can be joined with white glue and held in place with toothpicks while the glue dries.
4. Collage the pieces of fabric and paper as the foundation of the piece with white glue. You can overlap the pieces or push the edges into the foam with the knife. I like to then seal the surface with a coat of diluted white glue or acrylic sealer.
5. Once the surface has dried sufficiently that you can handle the piece without getting sticky, the embellishment fun begins. You can drip or smear paints or dry brush a white wash to get an aged or prim surface. Then attach your ephemera, strips of ribbon, buttons, charms, or cut-out stamped images with pins or pieces of wire.
6. I added “hair” to my totem figure by braiding yarns and pinning them to the head shape. I also added a cluster of small charms, beads and buttons to create an interesting character. In this one, I left the face area abstract, but you can certainly add button or bead features if you wish.
7. For a base, you can glue and nail a flat piece of strong cardboard, basswood, or an off-cut to the bottom so that it will stand flat. Or simply continue the collage around the bottom and let the piece lean against the wall if that is what it wants.
This kind of figure can work very well if the fabric remnants are from meaningful sources, like baby clothes or favorite items. Tissue paper also collages and adheres very well to the foam.
More photos and projects can be found on my Making, Mending, Mothering blog, which is at www.robyncoburn.blogspot.com.
Happy Crafting!
After a long career designing for theater and independent films, Robyn Coburn finds her joy as an unschooling mother who also writes and crafts. She has been a confirmed greenie since working for Greenpeace during her college years in Australia. Robyn is currently working on two crafty books, a fairy tale screenplay and a TV series about doll making and collecting. A past speaker and funshop presenter at Live and Learn Unschooling conferences, she contributes regularly to unschooling e-lists. She lives in Los Angeles, California with her husband James and ever inspiring daughter Jayn. Contact Robyn by email at dezignarob@gmail.com or visit her at www.robyncoburn.blogspot.com and www.Iggyjingles.etsy.com.
|

