|
The Versatile Bean
By Eleanore Lewis
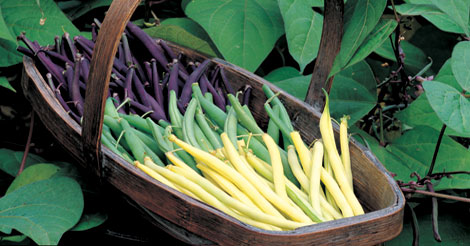
Young snap beans to eat fresh from the garden. Colorful green, purple and yellow beans. Bush beans that grow on compact stems and pole beans that clamber up tepees and trellises. Few vegetables are as varied as beans, as easy to grow and as versatile in the kitchen. Add nutrients to the equation and you have a truly bountiful crop, worthy of space in your garden.
Beans contain fiber and a lot of protein, including the essential amino acid lysine. (Most grains lack lysine; combine them with beans, however, and they form a complete protein.) They also provide folacin (folic acid) and some minerals. All together, beans are a healthful vegetable and they taste delicious.
What’s in a Name?
There are basically three types of beans: snap, green shelling, and dry shell. Snap beans are named after the sound they make when pods are broken. They “snap.” We grow snap beans to eat the pods fresh (or frozen); green shelling beans, such as limas, to eat the young, green seeds inside the pods fresh (or frozen); and dry shell beans for the mature seeds, which dry in the pods on the vine before being shelled.
All beans belong to the legume family (Leguminocae), as do peas and some favorite flowers, such as lupine, sweet pea, and baptisia. Legumes have the ability to fix nitrogen in the soil, which makes that nutrient readily available to plants.
Botanically, most of our edible beans are in the genus Phaseolus (pronounced phase-olus). Snap beans, French (sometimes called European or filet) beans, romano and wax beans are P. vulgaris. The genus name is from the Latin for kidney bean; the species name translates simply as “common.” French beans are bush-type beans that produce very narrow, sometimes pencil-thin, pods. Romano beans, a favorite from Italy, are thicker and flatter than other snap beans. Wax beans have yellow pods, which look rather waxy – but they don’t taste like wax! Bush snap beans take 45 to 55 days to bear a crop, depending on the variety; pole snap beans begin to bear in 60 to 70 days.
Lima beans are P. lunatus; lunatus means crescent-shaped, which limas are in a plump sort of way; they are often called butter beans in the south. Lima beans require slightly warmer temperatures than snap beans to germinate well. Bush limas take 70 to 80 days to produce a crop; pole limas need 80 to 95 days.
Other beans we grow to use in ornamental plantings. Old-fashioned and pretty scarlet runner beans, P. coccineus, are edible when the pods are young but are planted more for their attractive red flowers than their beans. Blue hyacinth beans, Dolichos lablab (also called Lablab purpureus) produce striking, deep lilac-blue flowers followed by maroon bean pods, which are edible but not the reason to grow the plants; they make a beautiful and fast-growing cover for all kinds of fences, trellises and arbors.
Bush versus Pole
Some gardeners like bush beans better than pole beans because bush beans produce a lot of pods in a short time frame; they do, however, take up more space in the garden than pole beans. Bush beans rarely have trouble with pests and diseases, simply because they are not in the garden long enough to be bothered. The bush bean’s shorter life span gives gardeners a chance to dig up the dead stalks and plant a different crop or a succession crop of beans.
Gardeners who prefer pole beans like the way they make great use of vertical space by climbing up trellises or tepees, a bonus in small gardens. Their longer presence in the garden does make them prey for pests and diseases, which can disfigure the foliage toward the end of the season. They also take more time to begin producing than bush beans, but they continue to bear slowly throughout the summer, which is advantageous if you do not want to eat beans every other day or bother to replant a crop.
Some gardeners think that bush beans taste better than pole beans, but just as many prefer the flavor of pole beans – definitely an individual choice!
How to Grow Great Beans
Beans are warm-season vegetables. If you plant before the soil has warmed up in late spring, the seeds may rot before germinating. Wait until all danger of frost has passed and soil and night temperatures remain at 55 degrees F (12 C) or higher – that may mean April in southern zones and as late as June in colder northern regions. Because they take longer to mature and prefer even warmer soil, lima beans may not have enough frost-free days for gardeners in the far north, unless you try starting them indoors. If you do, sow them in individual biodegradable pots about four weeks before setting them out in the garden; beans do not adapt well to transplanting.
Beans prefer a light, well-drained soil with a ph of 6.0 to 6.8. Prepare the soil before sowing: Dig to a depth of six to eight inches and incorporate organic matter, such as compost or dried manure.
Sow beans 1 to 1-1/2 inches deep. You do not need to sow very thickly because bean seeds germinate well.
Sow one to two bush bean seeds every three inches. A traditional method for sowing is to set up double rows, 18 to 24 inches apart. If you plant in single rows, allow 18 inches between rows. Bush beans also grow well in wide rows: Sow seeds in a three-foot wide by four-foot or longer bed. Although bush beans need no support, harvesting is easier if you set twigs or brushy prunings within the planting. Spread compost down the middle of the rows after you sow to give the plants a boost in nutrients.
Plan to extend the harvest of bush beans by making repeated sowings every two to three weeks until two months before the average first fall frost in your area.
Put pole beans on trellises or tepees on the north side of the vegetable garden, so the plants do not block the sun from other crops. Sow six to eight seeds in a circle around each pole of a tepee, one pole bean seed every three inches along a trellis.
Spread compost in a broad circle around a tepee after sowing for extra nourishment for the plants.
Beans germinate in six to ten days. When the plants have two sets of true leaves, thin snap beans to stand two to three inches apart, limas three to four inches apart.
Beans, like other plants, require at least one inch of water weekly, either from rain, a garden hose or a drip-irrigation system. Water early in the day, so the leaves of the plants dry before nightfall. Avoid working around or harvesting beans when they are wet to prevent the spread of disease.
Beans do not need extra fertilizing as long as you enriched the soil before planting.
Harvest snap beans when the pods are young – about four to five inches long (depending on the variety) – and the seeds within the pod are just beginning to swell. Snap the pod in half and then snap or cut the ends off, if desired, before cooking. Harvest lima beans when seeds are full size (the pods look pudgy) but before pods begin to yellow; shell before cooking.
When you harvest, don’t yank the pods from the stems because the stems may break; instead, hold the spray of beans near the stem-end in one hand and gently pull each bean off with the other. Keep beans harvested or plants will stop producing.
Growing Beans in Containers
Bush and even pole beans grow well in containers, outdoors or indoors, so you do not need garden space to harvest these nutritious vegetables.
To grow outdoors, select a large container, such as a half-barrel or a 12- to 24-inch diameter planter. For pole beans, set up a tepee made with bamboo poles or tomato stakes in a half-barrel. Sow beans at the same depth you do in the ground – one inch deep – and allow basically the same spacing between plants. Think in terms of the “square-foot gardening” method: Figure on nine plants per 12-inch container. With pole beans, sow three to four seeds around each pole.
Mulch the soil surface with a layer of compost, dried manure, or decorative wood chips. Water when the soil dries to a depth of two to three inches, depending on the size of the pot. Large containers cut down on the frequency of watering; the soil in small pots dries out quickly in the heat of summer. Fertilize once a month.
You can also grow beans indoors. Grow pole beans on a trellis in a planter or window box in front of a south-facing window. Make a living, green curtain: Attach monofilament fishing line in a crisscross pattern from a window box to the top of the window frame and train the beans up as they grow.
Select the sunniest window in the house. Water when the soil in the container dries to a depth of two inches. Fertilize once a month with a water-soluble fertilizer. Because most beans can self-pollinate, they produce pods without the help of breezes or bees, but you may want to brush your hand along the flowers occasionally just to be sure.
Kids and Beans
A lot of children don’t like beans (or any vegetable for that matter!). Attract them with a planting of their own, using the psychology that if they grow it they may actually want to eat it.
Let very young children (three to six or seven years old) discover how seeds work. In a glass jar filled with soil, sow a few bean seeds, pressing them against the glass so they show; moisten the soil. As the seeds germinate, the children will clearly see the roots and shoots begin to form as the two halves of the seeds split apart. The germinated seeds may not grow if you plant them outdoors because beans do not take to transplanting, so treat this as a fun experiment.
A note of caution: To avoid the disappointment of some seeds not germinating, do not use dried shell beans from the store; they have been dried for food consumption and undoubtedly will not germinate.
Set up a bean tent: Sow pole bean seeds around a tepee, leaving an opening between two of the poles. As the beans grow, they form a cool, dark tent where kids can hold secret meetings.
Because bean seeds are so large, they are easy for even the youngest child to handle. Set aside a space in your garden for the children to grow their own. No matter how inexactly they sow the seeds – even simply pushing the seeds into the soil to the depth of their first finger – the beans will grow, although you may want to help when the time comes for thinning. Try bush snap beans for a first-time planting; they mature faster than pole and lima beans.
Pests and Diseases
Modern bean varieties are resistant to many of the diseases that can infest a planting. Prevention is usually easier than a cure. With beans (and many other plants), avoid working around them while leaves are wet, thoroughly clean up garden refuse at season’s end and rotate crops from year to year.
Anthracnose, caused by a fungus, creates dark brown, red or black spots and a pinkish mold on pods or seeds. To prevent, avoid working around wet plants; remove affected plants; rotate crops from year to year.
Bean mosaic virus produces deformed pods and mottled leaves; the leaves wrinkle and curl under. To prevent its spread, control aphids, which carry it from one plant to another, and remove any affected plants.
Bean rust affects the undersides of leaves, with orange-brown blisters; leaves yellow and drop. To prevent, clean up the garden at the end of the season; avoid working around wet plants; dust leaves with lime.
Mexican bean beetle, a problem in the eastern United States and some parts of the southwest, resembles the beneficial ladybug, but it has 16 black spots and no white marking between the head and body. Round, yellow eggs, pale yellow larvae and adults usually remain on the undersides of leaves where the latter two forms feed until they skeletonize the leaves. In very hot and dry conditions, nature controls the beetles. Handpick all stages off leaves. Cover bush beans with row covers (pole beans are hard to cover). Interplant potatoes and beans; each repels the other’s favored pest.
Japanese beetle, mainly a problem in the east but spreading westward, spends its grub stage underground, often under lawns. The beetles skeletonize leaves. Rainy, cool weather deters them. Handpick from leaves or knock them off into a jar of soapy water. Plant white geraniums among the beans –” an element in the leaves will poison the beetles that munch on them. Set out traps; use with caution, however, because the traps themselves may attract the beetles from neighboring yards. Cover bush beans with row covers.
This article was contributed by the National Garden Bureau. Here is a recipe for a casserole using beans.
|